Thursday, December 15, 2011

Red Velvet Cheesecake


I'm not a huge fan of red velvet cake nor cheesecake even though cheesecake is the dessert I have probably made the most simply because other people(I'm talking about you mommy) request it. I don't like the idea of eating a lot of food coloring and I'm just more excited by cakes and tarts than cheesecake. However, my sister is a fan of both red velvet cake and cheesecake(new york style to be exact). So, when she saw this red velvet cheesecake on my list of recipes to try a few months ago, she promptly requested that I make it for her.

I finally did so this Thanksgiving and I have to say the end result was a success. The red velvet was so good that I'd be willing to make it again and again as cupcakes and layer cakes, even with the food coloring. It had just the right amount of chocolateyness, if there is such a word, but was definitely a red velvet cake and not a chocolate cake. Unfortunately, I didn't have any gel food coloring, so my cake didn't turn out as vibrant as I would have liked. The cheesecake was also really good and came together with the cake quite nicely. Next time, I might put a thin layer of cream cheese frosting between the cheesecake and red velvet cake just so it doesn't separate when cut. However, it looks like Elissa's cake didn't have that problem, so it all depends on the moistness of your cheesecake.

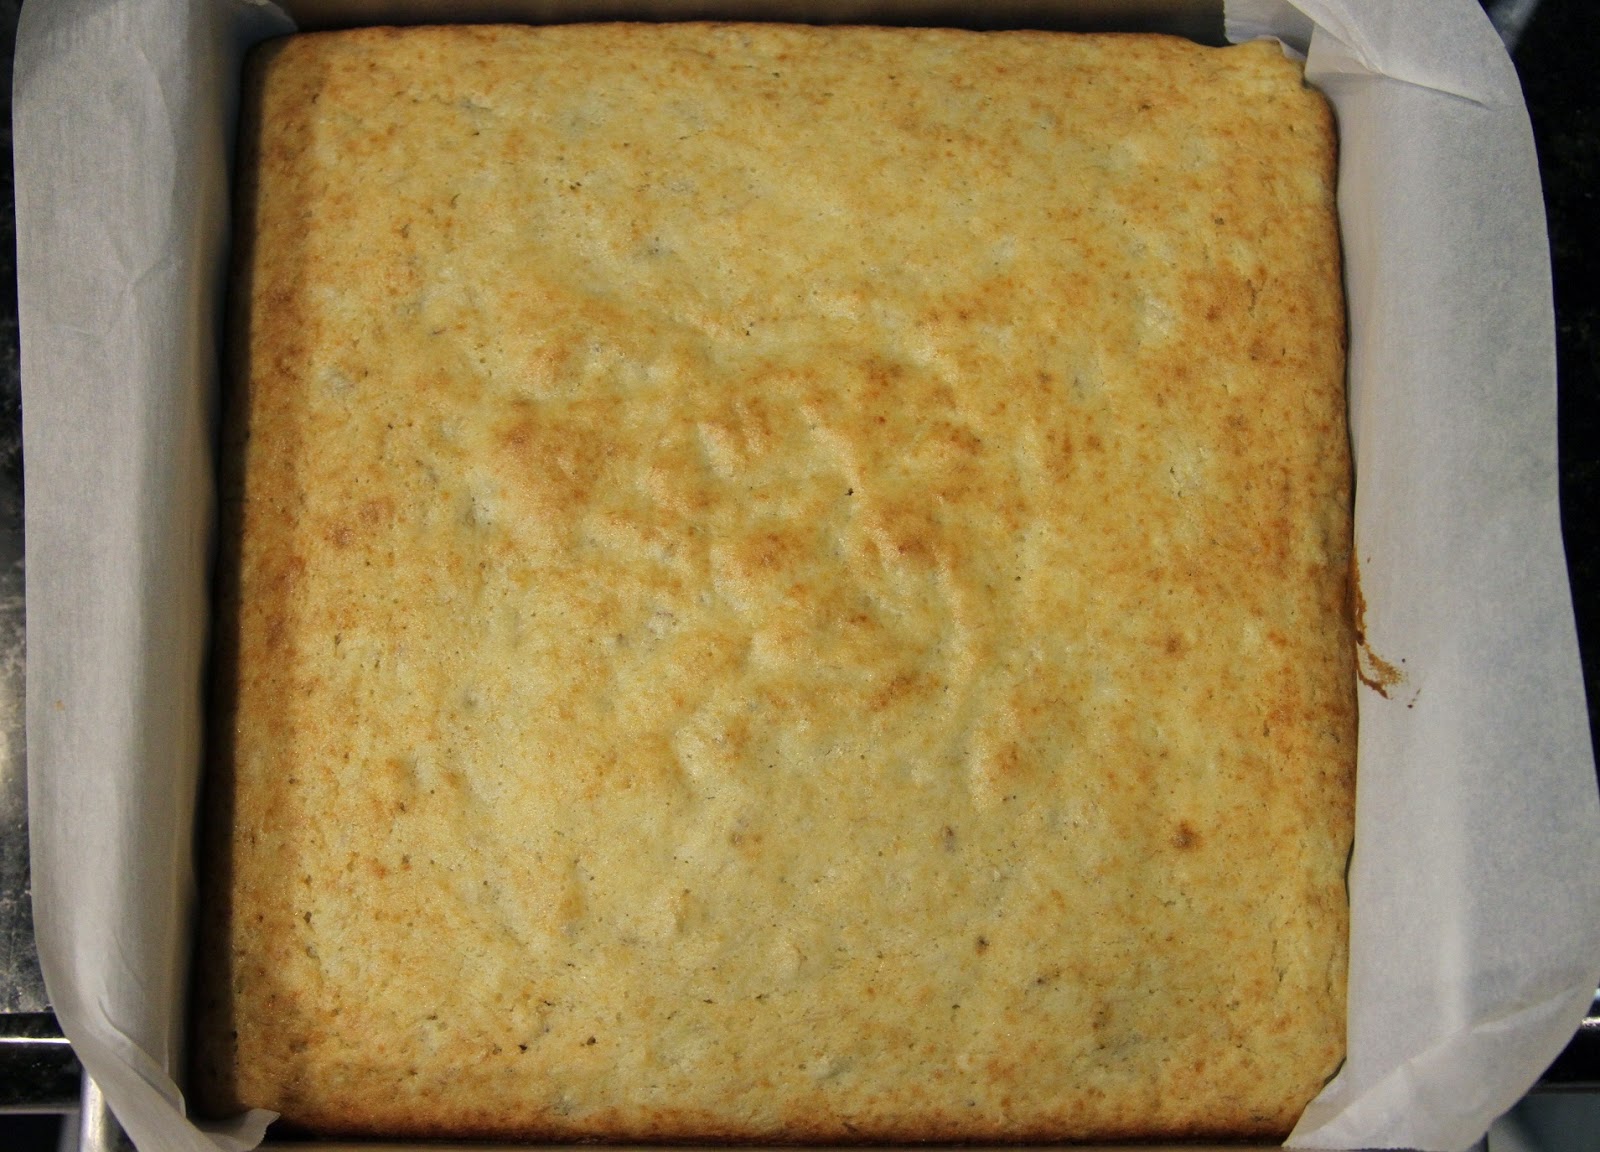
I adapted the recipe to make an 8" cake. I kept the recipe for the cake the same and just baked in smaller cake pans, but reduced the size of the cheesecake because I wanted a higher ratio of cake to cheesecake than the original recipe. I baked my cheesecake in a cake pan lined with parchment rather than a springform pan to ensure that it would be as close to the size of the cake layers as possible.

Red Velvet Cheesecake
Makes an 8" cake
Adapted from 17 and Baking/Saveur/Martha Stewart

Cheesecake - Make the day before you plan to assemble the cake
16 oz cream cheese, room temp
1/2 cup granulated sugar
1 1/2 tsp milk
pinch of salt
2 large eggs, room temp
1/3 cup sour cream, room temp
3/4 tbsp all purpose flour

Preheat your oven to 325 degrees F and boil a kettle of water. In a food processor or a mixer, beat the cream cheese until softened. Add the sugar and blend thoroughly until smooth. Mix in the eggs one at a time until just incorporated. Add the salt, milk, and sour cream. Finally, add the flour. Pour into a greased and parchment lined 8 inch cake pan, place in a hot water bath, and bake for about 30-40 minutes until the center is just set. Let cool until warm to the touch. Press plastic wrap onto the surface of the cheesecake and refrigerate overnight. Unmold the next day.

Red Velvet Cake
2 1/2 cups cake flour
1 1/2 cups sugar
1 tsp baking soda
1 tbsp cocoa powder
1/2 tsp fine salt
2 large eggs, room temp
1 1/2 cups vegetable oil
1 cup buttermilk, room temp
1 tsp vanilla extract
1 tsp white vinegar
red gel food coloring, as desired

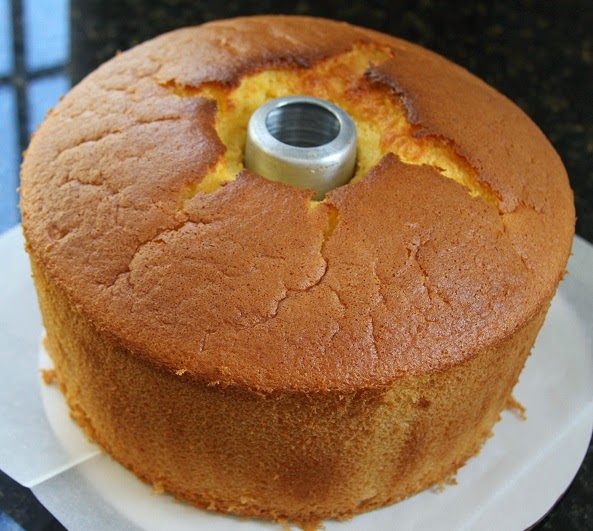
Grease and line two 8 inch cake pans with parchment paper. Preheat the oven to 350 degrees F. Sift the flour, baking soda, sugar, and cocoa powder into a bowl. In a mixer on medium speed, beat the eggs, buttermilk, oil, vanilla, and vinegar until well combined. Add the dry ingredients and mix on medium low speed until just combined. Mix in as much food coloring as desired. Evenly distribute the batter between the two cake pans and bake for 25-30 minutes, rotating halfway, until a toothpick inserted in the center comes out clean. Let the cake layers cool for five minutes, then invert and cool completely on a cooling rack. Level off the layers with a serrated knife if necessary.

Next, make the frosting.

Cream Cheese Frosting
10 oz cream cheese, room temp
5 tbsp unsalted butter, room temp
1 tsp vanilla extract
2 1/2 cups powdered sugar(sifted, then measured)

With a mixer, beat the cream cheese and butter until smooth. Mix in the vanilla extract. Add the powdered sugar gradually until it is all incorporated.

To assemble:
Remove the parchment from one of the cake layers and place the cake layer on a serving dish or turntable bottom side down. Flip the layer of cheesecake onto the cake, then remove the parchment. Flip the remaining layer of cake onto the cheesecake and remove the parchment. Trim the sides of the cheesecake so that it is the same size as the cake, if necessary. Crumb coat the cake by spreading a thin coat of frosting over the entire cake. Refrigerate for 30 minutes. Frost the rest of the cake with the remaining frosting. Decorate as desired and refrigerate until serving. The cake can be made ahead and will last several days in the fridge.

Saturday, December 10, 2011

Freezer Full of Pocket Pies

Since my last post on pizza pocket pies, I've been on a pocket pie craze. I've been making and filling them with just about everything. So far, I've already made turkey pocket pies with my leftover Thanksgiving turkey, breakfast pocket pies(egg, cheese, bacon, and potatoes), carnitas and corn pocket pies, and potato and pea samosa pocket pies. There doesn't seem to be anything that doesn't taste about a hundred times better wrapped up in tender flaky crust and I just can't stop thinking of new fillings to try out.

Here are some of the fillings that I've tried so far.The recipe for the dough can be found in the last post for pizza pocket pies. For the most part, fillings should be at least partially if not fully cooked through since they won't be in the oven for that much longer. It's also easier to assemble the pies if the filling is not too wet.

Cream Cheese Pastry Dough
Recipe in this post.

Potato and Pea Samosa Filling
Daydreamel Original
Makes enough filling for one batch of dough

4 medium sized russet potatoes
1 cup frozen peas, thawed, rinsed, and drained
1/2 an onion, diced
1 tbsp grated ginger
3 cloves garlic, minced
1/2 tsp chili powder
1/4 tsp ground cumin
1/2 tsp ground coriander
1 tsp garam masala
1/8 tsp ground turmeric
2 tsp lemon juice
Salt to taste, about 1/2 tsp

Rinse the potatoes, put them in a pot, cover with water, and bring to a boil. Boil until a knife pierces through, but the potatoes are not falling apart. Peel and dice the potatoes. While the potatoes are boiling, saute the onion over medium heat in a pan until golden with about 2 tbsp of oil. Add the ginger and garlic and saute for another minute. Add the spices and cook them for about 30 seconds. Add the diced potatoes and mix until the potatoes are coated evenly with the spice mixture. Saute another 3 minutes, add the lemon juice and salt to taste. Off the heat, mix in the peas. Let cool before filling the pocket pies.

Turkey Filling
Adapted from Mad Hungry
Makes enough filling for half a batch of dough

1 heaped cup cooked turkey, shredded
2 tablespoons unsalted butter
1/2 cup chopped onion
1/3 cup chopped celery (1 large stalk)
1/3 cup chopped carrot (1 carrot)
1/2 teaspoon coarse salt
2 tablespoons all-purpose flour
1 1/2 cups chicken broth
1/4 cup grated Parmesan cheese

In a heated pan, saute the vegetables with the butter over medium heat for 2 to 3 minutes. Add the flour, cook for another minute. Then, add the chicken broth and salt and cook until thickened, about 2 more minutes. Off the heat, stir in the shredded turkey and parmesan. Let cool and refrigerate overnight before using.

Monday, December 5, 2011

Mini Pizza Pocket Pies

Golden brown, delicious, and much better than those other pizza pockets found in your local grocery store

I made these mini pocket pies recently for a kids' party and decided to fill them with pizza toppings since I thought it would appeal to the kids. I didn't end up going, but I enjoyed these just the same. The dough is very tender, great for rerolling, and awesomely flaky. I'm excited to try this dough out for apple pocket pies. chicken pocket pies, and anything and everything that comes to mind. You can pretty much use whatever filling you want and make the pies bigger for a meal or smaller as appetizers. They're great for parties since you can make them ahead, freeze them, and then just bake them off the day you need them. They actually taste better when baked straight from the freezer because the crust is flakier.

Cream Cheese Pastry Dough
Adapted from Mad Hungry
Makes about 35 mini pocket pies, 20 larger ones

2 sticks unsalted butter, room temp
8 oz cream cheese, room temp
1/2 cup cream
1/2 tsp fine salt(double the amount of coarse salt)
3 cups all purpose flour, more for rolling

Mix together the butter and cream cheese by hand, with a mixer, or in a food processor until relatively well combined. Blend in the cream and salt. Then add the flour, mixing until it just starts to come together. Finish by hand.

Divide into two flattened disks, wrap in plastic wrap, and refrigerate at least 30 minutes or overnight.

When ready to assemble, roll the dough out thinly on a floured surface to about 1/8 of an inch or less flouring as needed. You want it to be thin, but not too thin that it will break when filled. Use a glass or a small bowl about 4 inches in diameter to cut out rounds of dough. Cut out rounds about 5 inches in diameter for the bigger pocket pies.

Fill with about 3 tbsp of filling, 1/4 cup for the larger ones. Seal and crimp with a fork or seal in any way that you please. Be sure to seal them tightly as they can open up when baked. Freeze in a single layer on a sheet pan lined with parchment, then place the frozen pocket pies in a ziploc bag for longer storage.

When ready to bake, preheat oven to 375 degrees F. Lay the pocket pies out on a sheet pan, brush lightly with egg wash(a beaten egg + 1 tbsp water) and bake for about 35 minutes.

Pizza Filling
1/2 cup pepperoni slices, cut into small pieces
1/2 cup mozzarella, cut into about 1/4 inch cubes
1 1/2 cups tomato sauce
1 tsp italian seasoning(or mix of dried thyme, oregano, rosemary)
1 tsp granulated garlic
black pepper to taste

Pumpkin Roulade

I've been making this pumpkin roll for several years now and it's become a Thanksgiving/Christmas/holiday season favorite. I went a little crazy the first year making about 8 of them for Thanksgiving and Christmas combined and since then have only made about three a year depending on what other holiday desserts I feel like trying out that year and the number of holiday events I attend. I'll probably be making at least one every holiday season for the foreseeable future since it doesn't seem right to let the holiday season pass by without this cake fitting in somewhere.
I haven't met anyone who doesn't like this cake, okay maybe one or two, but they're few and far between. It's cake and frosting rolled up in a pretty spiral shape, what's not to love. It's also quick and pretty simple once you get the hang of it. Just be sure to have everything(kitchen towel, powdered sugar in a sieve, plenty of space) ready when the cake comes out of the oven so you can flip it over, remove the parchment, and roll it up quickly to prevent cracking. The cake is very moist, maybe even a bit too moist because of the pumpkin, but it's better this way since it may dry up a bit in the fridge, that is if it isn't polished off immediately.
My family likes a higher ratio of cake to frosting, so I keep the cake recipe the same and halve the amount of frosting. The recipe below reflects these changes.

Pumpkin Roulade
Adapted from Ina Garten

Cake
3/4 cup all purpose flour
1/2 tsp baking powder
1/2 tsp baking soda
1 tsp ground cinnamon
1 tsp ground ginger
1/4 tsp ground nutmeg
1/4 tsp fine salt(twice the amount of kosher salt)
3 extra large eggs
1 cup sugar
3/4 cup canned pumpkin
confectioner's sugar for dusting

Frosting
4 oz mascarpone cheese, room temp
2 oz cream cheese, room temp
1 tbsp heavy cream/milk
pinch of salt
1/4 cup +2 tbsp sifted confectioner's sugar
1/8-1/4 cup minced crystallized ginger(optional)

Preheat the oven to 375 degrees F. Butter a 13 by 18 by 1 inch sheet pan. Line with parchment and butter and flour the parchment paper.

Sift the flour, baking powder, baking soda, cinnamon, ginger, nutmeg, and salt in a small bowl.

Beat the eggs and sugar in a mixer with a paddle attachment or with a handheld mixer on medium-high speed for 3 minutes, until pale and thickened. On low, mix in the pumpkin, then the flour mixture. Finish mixing by hand with a spatula and pour into the pan. Bake for 15 minutes, until the top springs back when touched.

While the cake is baking, lay out a clean kitchen towel and sift confectioner's sugar over it. Invert the cake onto the towel and peel away the parchment. Sift more confectioner's sugar on it and gently roll it up in the towel. Let cool completely.

To make the frosting, beat the mascarpone and cream cheese together until smooth, then add the remaining ingredients and mix together until light and fluffy.

To assemble, unroll the cake, spread with the frosting, and reroll gently. Trim the ends and serve. Cake is best the day it is made.

Sunday, November 13, 2011

Pepperoni Pizza Monkey Bread

I was scrolling through my bookmarked recipes and since I've been on a bread making high lately and I happened to have a package of pepperoni in my fridge(I intended to make pizza), this one caught my eye. It's really as good as Gaby from What's Gaby Cooking says in her original post and well worth the effort. It's fun for both kids and adults to pull off the pieces of bread and with a name like Monkey Bread, who wouldn't love it? I can't wait to see what other types of monkey bread I can make. Since this bread dough is not too salty, it would likely also work well in a sweet monkey bread with maybe cinnamon sugar, fruit preserves, or chocolate.
I made some substitutions to this recipe such as replacing the butter with olive oil for both ease and nutritional value and it was delicious. In most cases, I find that replacing butter with oil works just fine and doesn't sacrifice much in terms of taste, especially when there's cheese to make up for it. It doesn't work in the case of pie crust or cookies, but it does work in most savory applications such as mac and cheese and bread. If the pepperoni you're using in this recipe is oily, you may want to cook it over a low heat to remove some of the oil before you use it. Also try to use a lower sodium pepperoni if you can as it can be a bit salty when baked. If you make this for your next party or get together, kids or not, it will definitely be a hit.

Pepperoni Pizza Monkey Bread
Adapted from What's Gaby Cooking

2 1/4 tsp dry active yeast
1 cup warm water
1 tsp sugar
1 tbsp fine salt
2 cups bread flour
1 cup all purpose flour
1/4 cup extra virgin olive oil
1 cup parmesan or asiago cheese, grated
1/2 cup pepperoni slices, cut up
1 tsp dried oregano (I used a mix of dried Italian herbs)
2 cloves garlic, minced (I used granulated garlic)
2 large pinches of salt

Mix the yeast, sugar, and water in the bowl of a stand mixer and let sit for 5 minutes to activate. If it doesn't become frothy, try again with new yeast.

Add the flours gradually to the bowl and mix with a dough hook on low-medium speed. Mix in the salt, then knead for 8-10 minutes in the mixer until the dough starts to pull away from the sides. Place the dough in an oiled bowl and let rise for about an hour or doubled in size.

After the first rise, punch dough down and portion out the dough into balls about an inch in diameter. Combine the olive oil, cheese, pepperoni, dried herbs, garlic, and salt in a bowl. Mix the dough balls in this mixture and arrange them in a large bundt pan. Let rise for another 40 minutes or so.

Preheat the oven to 375 degrees F, bake the bread for 30 minutes until it is golden brown. Serve with pizza sauce or on its own.

Kabocha Squash Pie

I find that most of my cooking and baking revolves around what I have in the kitchen and what needs to be used up first. More often than not, I'll buy ingredients with the intention of using them in one dish, but end up using them for something else. My family also tends to buy more than we need at once, so we usually need to find creative ways to use things up.

This was one of those cases, the ingredient in question? A kabocha squash. It's been sitting around for a few months waiting to be used, but nothing ever became of it...until earlier this week. My dad peeled it and steamed it intending to use it for a dessert of his own, but decided against it because he didn't think it was starchy enough. So, we were left with about 5 cups of kabocha squash puree without any plan to deal with it.

My mom suggested that maybe I could make a pie with it and that sounded like a good idea since it would be similar to a pumpkin pie. It's also the perfect time of year for a pie full of spices like cinnamon and nutmeg. So, I set off to find a recipe for kabocha squash pie, made it, and was actually really pleased with the results. It's denser, stronger in flavor, and less sweet than pumpkin puree, but most people that tried it were fooled into thinking it was a pumpkin pie. I would definitely make this again and if you don't have extra kabocha squash puree around, this recipe will work just as well with canned pumpkin puree(15 oz) as it's basically the same recipe. I added more spices than was called for because the added spices really made it taste just like pumpkin pie, but adjust to your own taste.

I drained my squash puree since it was steamed and fresh puree tends to have more liquid than canned puree, but if yours is roasted, it may not be necessary. I like to bake the pie about 20 minutes in the beginning on the lower third of my oven to ensure that the bottom is browned nicely. Enjoy the recipe and give it a try with different autumn squashes as well.

Kabocha Squash Pie
Adapted from Martha Stewart

Pie Crust
1 1/4 cups all purpose flour
1 stick cold unsalted butter, diced
1/2 tsp granulated sugar
1/4 tsp fine salt
1/8-1/4 cup iced water

Pulse the butter, sugar, salt, and flour in a food processor until the butter is the size of peas. Gradually add just enough iced water as the processor is running until the dough just holds together when squeezed in the palm of your hand. Dump out onto a piece of plastic wrap and form into a round disk. Refrigerate at least 30 minutes and up to 3 days or freeze up to a month.

When ready to use, roll out the pie dough to a round big enough for a 9 inch pie plate. Fit into the pie plate, crimp, dock with a fork, then freeze for 10 minutes. Line with parchment paper and fill with pie weights or beans. Bake in a preheated 375 degree F oven for 30-35 minutes removing the parchment and pie weights halfway through so that the crust can begin to brown. Remove when the crust starts to color nicely.

Reduce oven to 350 degrees F.

Filling
1 3/4 cups kabocha squash puree
1/2 cup brown sugar, lightly packed
1/4 cup granulated sugar
1 12 oz can of evaporated milk
3 large eggs
1/2 tsp vanilla extract
1/4 tsp fine salt
1 1/3 tbsp cornstarch, sifted
1 1/2 tsp pumpkin pie spice + 1 tsp ground cinnamon( or use 1 1/2 tsp cinnamon, 1/2 tsp ground ginger, 1/4 tsp ground cloves, and 1/8 tsp ground nutmeg)

Mix cornstarch with a bit of the milk first to eliminate any lumps, then add in the rest of the ingredients mixing until blended.

Pour filling into the prebaked crust and bake at 350 degrees F for 50 to 60 minutes until the center just wiggles slightly and a toothpick inserted gently about an inch from the center comes out clean. Let pie cool completely at least 6 hours or overnight in the refrigerator before serving.(Since I made it on a rather cold day, I didn't bother putting it in the fridge.)

Wednesday, November 9, 2011

A Sweet Sourdough Bread

As you may know, I've been on the search for a good honey wheat bread. Since my first post on bread, I've made several loaves of honey wheat bread, each with a different recipe. While I have yet to find one that replicates the one in Berkeley that first made me fall in love with honey wheat bread, this one has been my favorite thus far and I was really surprised at how much I liked it.


What's interesting about this honey wheat bread is that it uses sourdough starter, but with the amount of honey in this recipe, it doesn't taste like sourdough bread. It just tastes like a nice slightly sweet honey wheat bread. It is great toasted and buttered and is not too sweet to use in both sweet and savory applications. I thought the ratio of whole wheat flour to bread flour was also perfect since the bread had a nice light whole wheat flavor without sacrificing texture. Those that don't like whole wheat bread in my family also liked it. For more whole wheat flavor, you can also easily replace some of the bread flour with whole wheat flour. I also liked the fact that I could use my sourdough starter in it to produce a loaf with the depth of flavor that a starter provides but is not sour. For an everyday honey wheat bread for those that don't really like wheat bread, this would be my choice assuming you have a starter to use or you could just make one the night before for usage the next day.

Although you can easily make bread without a starter, I've found that I really prefer the taste of bread made with starter. I've also realized that I much prefer bread shaped into a loaf and baked on a sheet pan rather than in a loaf pan because the texture is much lighter. The resulting shape is more difficult for sandwich making, but that's something I'm willing to give up.

Light Honey Wheat Sourdough(Not really) Bread
Adapted from JulieK at allrecipes.com
Makes 1 large loaf or 2 medium sized loaves

1 1/3 cups liquid sourdough starter
1 cup warm water(warm but not too hot to touch)
1 tbsp vegetable oil/butter
2 tsp active dry yeast
1/3 cup honey
3/4 tsp fine salt(double the amount of coarse salt)
1 cup whole wheat flour
4 - 4 1/2 cups bread flour

Mix the yeast with the water in the bowl of a stand mixer and let sit for 5 minutes to activate.  Add in the honey, starter, and oil.

With a dough hook, mix in the whole wheat flour and salt, then the bread flour. Knead in the machine 8-10 minutes until dough comes together into a ball and is not too sticky. Add more or use less flour as necessary. Place dough into an oiled bowl, cover with plastic wrap, and let rise 1 1/2 hours or until doubled in size in a warm place.

After the first rise, punch dough down and shape into a large loaf or 2 smaller loaves on a sheet pan, Let rise another 1 1/2 hours. Slash the loaves.

Preheat oven to 375 degrees F. Bake for 30 minutes or until it sounds hollow when thumped.

Blum's Coffee Crunch Cake


This is another one of those recipes that I've long wanted to try making myself and my dad's birthday was the perfect time to do so. I was surprised at how simple this cake was to make. Although there are a few components to get together, the process is fairly simple. The addition of lemon juice and zest brings some dimension to the cake, but it is unexpected, so if you would rather keep it simple, just substitute with coffee. I thought the combination worked, but some members of my family thought it was a bit strange. Overall though, everyone enjoyed it and compared to coffee crunch cakes I've had, this one is definitely the best. The chiffon cake itself would be great in other layer cakes as well.

Blum's Coffee Crunch Cake
Recipe from Flo Braker via fancyfoodfancy
Makes One 10 inch cake

Cake Layers
1 1/4 cups cake flour, sifted
1 1/2 cups sugar
1/2 tsp salt(halve if using fine salt)
1/4 cup water
6 large egg yolks
1 cup egg whites(about 6-8 large eggs)
1 tsp cream of tartar
1 tsp vanilla extract
1 tbsp lemon juice/coffee
1 tsp grated lemon zest(optional)

Preheat the oven to 350 degrees F. Sift the cake flour with the salt and 3/4 cup of sugar, set aside. Whisk the egg yolks in a bowl with 1/4 cup sugar until pale and thick. Whisk in the water and beat until thickened.

Whip the egg whites in a stand mixer with a whisk attachment on high speed until frothy, add the cream of tartar and whip until soft peaks. Slowly add the remaining 1/2 cup sugar while whisking until it reaches stiff, glossy peaks. Whisk in vanilla, lemon juice/coffee, and lemon zest if using.

Fold the egg whites and flour mixture into the egg yolks starting with a third of the whites followed by a third of the flour mixture alternating until everything is incorporated. Pour batter into an ungreased noncoated 10 inch tube pan with a removable bottom.

Level top and bake for 50-55 minutes until a cake tester comes out clean and it springs back when lightly touched. Invert onto a cooling rack and let cool completely. Cut around the sides and bottom to remove cake from pan, cut into 2 layers.

Coffee Crunch
1 tbsp baking soda, sifted
1/4 cup strong brewed coffee
1 1/2 cups sugar
1/4 cup light corn syrup

In a heavy-bottom medium saucepan, mix the coffee, sugar, and corn syrup. Stirring occasionally, heat over medium low heat until sugar dissolves, then increase to medium-high heat and let boil until it reaches 290 degrees F on a candy thermometer. Remove from heat and stir in the baking soda. Pour onto a parchment lined or oiled baking sheet, do not spread. Let cool for at least 1 hour. Break into small pieces in a ziploc bag using a rolling pin. Store in an airtight container for assembly later.

Whipped Cream Frosting
2 cups heavy cream
2 tbsp sugar
2 tsp vanilla extract

Whip the cream, sugar, and vanilla in a stand mixer with the whisk attachment until soft peaks. Frost cake with whipped cream, then refrigerate cake. Top cake with coffee crunch when ready to serve.


I made this cake for my mom's birthday per her request. It's made up of genoise from the raspberry cream cake, vanilla custard from the banana cream pie recipe, strawberries, and bananas topped with a whipped cream frosting. While my cake baking skills are improving, my decorating skills still need some work. This was a nice combination, but I put a bit too much fruit in it. Next time, I might try adding some baking powder or cream of tartar to this genoise for an airier cake. It's not traditional and might no longer be considered a true genoise, but to each their own. 

Saturday, October 22, 2011

Chocolate Chip Oatmeal Cookies


Chocolate chip oatmeal cookies are my favorite cookie, for sure. While I like the classic chocolate chip, I love the chewiness and nutty flavor that the oats add. The added health factor of the oats also makes me feel less guilty about the other ingredients in these cookies and if you use dark chocolate, the health benefits practically demand that you make these cookies right now, seriously. These cookies are pretty much perfect. They're chewy and slightly crispy at the edges. I added in a bit more oats to the recipe to amp up the texture and flavor of the oats and I might omit the water next time, but these cookies definitely deserve a place in your cookie repertoire.

That being said, I will continue to try out other chocolate chip oatmeal cookie recipes in the search for the very best. You can never have too many recipes for such an awesome cookie.

Oatmeal Chocolate Chip Cookies
Adapted from Mad Hungry, Lucinda Scala Quinn, Marthastewart.com
About 24 cookies

6 ounces semisweet chocolate chips or dark chocolate chunks
1 stick of unsalted butter(4 oz)
6 tbsp brown sugar
6 tbsp granulated sugar
1 1/8 cups rolled oats
3/4 cup all purpose flour
1 large egg
3/4 tsp coarse salt(1/2 the amount if using fine salt)
1/4 tsp water
1/2 tsp vanilla extract
1/2 tsp baking soda

Preheat the oven to 375 deg Fahrenheit. Whisk the flour, baking soda, and salt in a small bowl, set aside.

Cream the butter and sugars together with a handheld mixer or in a mixer with a paddle attachment. Add the egg, vanilla, and water mixing well after each addition. Add in the flour mixture mixing until just combined. Mix in oats and chocolate chips.

Scoop tablespoonfuls or use a small ice cream scoop to drop mounds onto parchment lined rimmed baking sheets spacing an inch apart. Press down slightly for flatter cookies. Bake for 10-12 minutes until lightly golden. Move to cooling racks.

Store in an airtight container for a few days or freeze scooped dough balls for baking another time.

Saturday, October 8, 2011

Quick Banana Cake

Whenever I buy a bunch of bananas, I wait until they ripen a bit before I eat them because I like the sweet scent of slightly ripened bananas. However, since the window of time between ripe and overripe is very small, I often find myself left with a few bananas that are too ripe to eat. Since I love bananas in baked goods, this isn't a bad problem to have.
This cake is perfect for using up those overripe bananas you have laying around. It's very quick and easy to put together and is great either steamed or baked. It's moist, not overly sweet, and makes a great treat for breakfast or an on-the-go snack.

Quick Banana Cake
3 ripe bananas, mashed
3 eggs
120 grams granulated sugar
110 grams oil
225 grams all purpose flour
1 tsp baking powder
1/4 tsp baking soda
Large pinch of salt
1 tsp vanilla extract

Preheat the oven to 350 degrees Fahrenheit.

Sift the flour, baking powder, baking soda, and salt into a bowl, set aside. In another bowl, whisk the eggs and sugar until it becomes pale and forms a thick ribbon.

Mix in the oil and bananas, whisking thoroughly after each addition.  Add the vanilla extract. Fold the flour mixture into the egg mixture until just combined. Pour the batter into an 8 x 8 inch square pan, bake for 30 minutes or until a cake tester comes out clean.

Note: This cake can also be steamed over medium high heat until the cake tester comes out clean, probably around 30 minutes.

Friday, October 7, 2011

Mascarpone Cheesecake


This is the dessert that I've made the most since I started baking. I would say that I've made close to 20 of these cheesecakes if not more.* A mascarpone cheesecake is much lighter than a new york style cheesecake and also not as tart, so if you're looking for a dense new york cheesecake, this is not it. However, I've found that many people like this cheesecake because it is lighter and sweeter than the typical cheesecake.

If you love cheesecake, I really recommend giving this one a try. It's a family favorite and will please most cheesecake fans.

*This title has since been claimed by the chinese style chiffon cake also found on this blog, though this is still one of my favorites.
Mascarpone Cheesecake
Adapted from Giada De Laurentiis

Crust:
2 cups graham cracker crumbs
1 tbsp granulated sugar
3 tbsp unsalted butter, melted

Filling:
16 ounces of cream cheese, room temp
16 ounces of mascarpone cheese, room temp
1 cup sugar
Pinch of salt
2 tsp fresh lemon juice
1 tsp vanilla extract
4 eggs, room temp

Preheat the oven to 350 degrees Fahrenheit.

Mix the crust ingredients together in a bowl, press into the bottom of the springform pan and slightly up the sides if you wish. Bake until the crust is set and starting to brown, about 10 minutes. Cool. Decrease oven temp to 325 degrees Fahrenheit.

To make the filling, place the cream cheese, mascarpone cheese, and sugar in a food processor. Process until smooth. Add the lemon juice and vanilla and blend until smooth. Add the eggs one at a time, blending after each addition.

Pour the filling into the crust and bake until the center moves slightly when shaken, about 1 hour and 5 minutes. Cool the cheesecake completely on a rack for a few hours, then refrigerate at least 8 hours or overnight. Run a knife around the sides of the springform pan to remove and serve cold.

Note: Most cheesecake recipes tell you to bake in a water bath so that it doesn't crack. I've found that cracking is mostly due to air incorporated into the cheesecake when beating or extreme changes in temp which is why I've switched to making my cheesecake fillings in a food processor and let the cheesecake cool slowly after it's baked. Even when I used to bake my cheesecakes in a water bath, they would crack in the refrigerator because I cooled them down too quickly. Of course, if you would like to use a water bath anyway just in case, that's up to you. If your cheesecakes still end up cracking, just cover it up with a topping like melted chocolate, jam, or berries. No matter what, it will still taste delicious.

Banana Cream Pie


There are few things more perfect than a banana cream pie, but though I love them so, I've never made one until now. However, seeing as I had all the ingredients I needed and a pie crust to use up, I finally decided to make one and this one turned out pretty perfect. It's beautifully creamy and decadent without being overly rich. It has great banana flavor and I love that it's firm enough for a slice to stand on its own, but not so firm that you lose the airy texture of a cream pie.

The recipe is basically the same as the original. I've just altered some of the directions because it seems to work out better this way. If you're looking for a great banana cream pie, look no further.

Banana Cream Pie
Adapted from Martha Stewart's Baking Handbook

Pate Brisee - Makes one pie crust
1 1/4 cups all purpose flour
1 stick cold unsalted butter, diced
1/2 tsp granulated sugar
1/2 tsp salt(use half the amount of fine salt)
1/8 - 1/4 cup of ice water

* If you have the time, make this crust using the technique described here. It is seriously the flakiest pie crust I've ever had, there are clear visible layers within the crust. However, the crust is just as good and still beautifully flaky made the way below.

Blend the flour and salt in a food processor to remove any lumps, add the cold butter and pulse until it is the size of peas

Add the ice water slowly using only enough so that the crust holds together when you squeeze it in your hand, it should not be too crumbly, nor too wet. Dump the dough onto a piece of plastic wrap and gather it into a mound, then flatten into a thick disc. Refrigerate at least 1 hour or overnight.

When ready to make the pie, take the dough out of the refrigerator and roll it into a big enough round to fit a 9 inch pie dish.

Preheat the oven to 375 degrees Fahrenheit. Fit the dough into the pie dish, fold edges under, crimp, and prick all over with a fork. Brush the edges with egg wash and chill for 30 minutes until firm. Line with parchment, fill with pie weights or dried beans, then bake for 25-30 minutes until edges are golden brown. Remove pie weights and parchment, then bake for another 20 minutes. Let cool.

Vanilla Custard
3 cups whole milk
7 tbsp cornstarch
1/2 tsp vanilla extract
2/3 cup granulated sugar
4 large egg yolks
1/4 tsp salt

Heat milk with sugar and salt in a saucepan until it reaches a simmer. In a bowl, whisk the egg yolks with the cornstarch and vanilla until there are no lumps. Add the heated milk into the yolks a little at a time whisking all the while. Return the mixture to the saucepan and cook over a medium heat whisking constantly until the mixture begins to thicken. Strain over a sieve into a bowl and let cool slightly. Place a piece of plastic wrap directly on the surface of the custard to prevent a skin from forming and when it has cooled down some more, chill in the refrigerator until completely cooled.

Whipped Cream
1 cup of heavy cream
2 tbsp powdered sugar

Place ingredients into a chilled bowl and whisk with a mixer until it reaches soft peaks, do not overwhip.

To assemble:
3 or 4 bananas, cut into 1/4 inch slices

Arrange bananas in a spiral on the bottom of the pie crust, top with the custard, then finish with the whipped cream. Chill in the refrigerator at least 1 hour. When ready to serve, you can cut some more bananas and arrange them on the top or serve as is. The pie is best served the day that it is made.

Monday, September 19, 2011

Yeast Starters and Bread


Fluffy Sourdough
Last week, I decided to start making bread. I had intended to do so several months ago, so I already had the necessary ingredients. Days passed, then months, and I just never felt like I had enough time or had the energy to start. Every time I scrolled through my log of recipes deciding which I should try next, I always went with something simpler and less time consuming. However, I knew that the economy-size package of yeast I purchased would eventually go bad and so, I needed to start making a dent in it pretty soon. In one of these recipe scrolling moods a few days ago, uninspired by the many desserts on my list, I looked to the bread recipes on my list, but none of them really felt like the right place to start.

For a while now, i've been wanting to make my own honey wheat bread. I love the Honey Wheat Bread at Cafe Intermezzo in Berkeley, but it's not exactly a short trip there just to buy the bread. It also seems that since I first tried this place a couple years ago, they have reduced the sweetness in the bread which was what I loved about it in the first place. Unlike typical whole wheat bread, their bread has great wheat flavor, but it is as soft and fluffy as white bread. After many unsuccessful attempts to track down a similar-tasting supermarket honey wheat bread, I just gave up altogether and hoped that I would somehow be able to recreate it in my own kitchen so I could have it whenever I wanted. Although this was the bread initially on my mind, a little internet research led me down a different path.

Last year around the time of the release of the Tartine Bread cookbook and the promo video with Chad Robertson, I was fascinated by the process of making artisan yeast bread. The idea of a starter, the preservation of it, and the intricacies of bread making intrigued me.After the proper internet research and recipe gathering, I was less daunted by the process of it all. As a native San Franciscan and sourdough lover, I thought it only right that I should attempt to raise a sourdough starter and try my hand at making sourdough bread.

From my research, I knew that it would take about two weeks for my starter to sour.  However, before it does sour, the starter can be used in the same recipes to produce delicious white bread. As of this post, my bread has not begun to sour yet, but with each loaf, I can tell that the flavors are getting more complex and slowly moving towards that sourdough flavor.I have already made several loaves of bread from this starter since I first mixed it up a few days ago from a wheat bread to an apricot and ginger loaf. As it turns out, starter is amazingly versatile and once you get the hang of how bread should feel, it's actually very easy and can be used to make a variety of breads. First, the mixing and growth of the starter.


Sourdough Starter
Adapted from Esther Nelson on Allrecipes.com

2 cups of all purpose flour
2 cups warm water
2 1/4 tsp active dry yeast
1 tsp sugar

In a large bowl, mix all ingredients together with a whisk until smooth. Cover loosely with plastic wrap. Leave at room temperature in a draft free area for 8 to 12 hours. You can start to bake white bread with it at this point. Leave it at room temperature for 4-8 days feeding it at least every day for faster growth or in the refrigerator for slower growth feeding every two days or so. Don't expose the starter to temperatures that are too hot as the yeast will die. If you are unable to feed the starter for a while, store it in the freezer and take it out when you can begin taking care of it again. The starter should be a creamy white. If you see any pink or yellow growth, throw the starter out and begin again. If you have a liquid at the top, that is the alcohol from the fermentation, just mix it back into your starter before using or feeding. The starter should have the consistency of pancake batter.


Feeding the starter:
For the first few days, feed it more frequently to encourage growth by adding  at least 1/4 cup of flour and 1/4 cup of warm water to the starter each day and whisking it in to incorporate air. You may remove some of the starter each time before you feed it if you like or just leave it.

However, you will need to refresh the starter every few days by removing a cup or so(either use it or discard it) leaving at least a quarter cup behind when feeding. In feeding it after the initial period, replace whatever you take out with at least a half cup each of flour and warm water(always in equal amounts) and whisk until smooth. You can add more or less flour and water depending on how much you want to end up with for baking.

After each feeding, wait at least 6-8 hours before using it again to give the starter time to grow. If your starter is in the refrigerator, take it out the night before you plan to use it to thaw.


Artisan Style Sourdough Bread
Adapted from Emeril Lagasse, makes one loaf

1 1/2 cups of sourdough starter
2 cups of bread flour, more for kneading
1 1/2 tsp coarse salt
1 1/2 tbsp sugar

In a mixer with a dough hook, mix flour gradually into the starter with the salt and sugar. Mix for 8 to 10 minutes until dough no longer sticks to the bowl. Remove dough from mixer and knead a few times into a smooth ball. Place into an oiled bowl, cover with plastic wrap and let rise in a warm place for about 1.5 hours until doubled. I preheat my oven for a few minutes, turn it off, then place the bowl in there to rise.

After the dough has risen, punch dough down. Shape into a loaf, then place onto a baking sheet or baking stone and let rise for another hour or until doubled. Preheat oven to 375 degrees Fahrenheit, slash loaf and place your baking sheet or stone with the loaf into the oven. Bake for about 30 minutes until bread sounds hollow when thumped on the bottom. Let it rest about 30 minutes before serving.

For apricot and ginger bread, add in 1/4 cup of chopped dried apricots and 1/4 of chopped candied ginger when mixing dough. You can also add in many other things such as nuts or other dried fruits and cheese.

Loaf is topped with shredded Comte before baking

Fluffy Sourdough Bread
Makes two loaves
Adapted from Donna on allrecipes.com(San Francisco Sourdough Bread)

2 1/4 tsp yeast
1 1/2 cups starter
4 3/4 cups bread flour
1 cup warm milk
3 tbsp sugar
3 tsp coarse salt
2 tbsp softened butter

Combine 1 cup flour, yeast, sugar, and salt in the bowl of a mixer with a dough hook. Add milk and butter. Mix in starter, then gradually add the remaining flour. Knead for 8 to 10 minutes. Then turn out onto a floured surface and knead into a smooth ball. Place in an oiled bowl and allow to rise for at least one hour in a warm place.

After the first rise, punch dough down, shape into loaves, then place on a baking sheet to rise for another hour. After it has risen a second time, bake in a preheated 375 degree oven for 30 minutes until it sounds hollow when thumped. Let it rest about 30 minutes before serving.

You can brush with egg for a golden brown crust and top with cheese as I have done here. The cheese and egg can weigh the bread down slightly, so that it is not as airy.

You can use all purpose flour to make your bread, but it won't have the chew of bread made with bread flour. Other types of flour can be substituted as well in varying amounts according to your taste. I have also used cream, nonfat milk, and coconut milk as substitutes for milk in these recipes, so anything will work although I've read that fat and sugar do contribute to the softness of the bread, so take that into account when making substitutions. Spritz the loaf with water or brush with egg wash for a thicker crust. Add different things to your bread for different flavors such as instant coffee granules, cocoa powder, matcha green tea powder, different extracts, etc.

I have also made an all wheat bread using this starter, but will not share that here because it is not the Honey Wheat recipe I am after. This is what it looked like.

9/28
It has now been about two weeks and I still have my starter. I've been feeding it about every two days and have been making a loaf of bread with what I take out. A few days ago, I almost killed my starter by overheating it, but was able to save it with additional yeast, flour, and water. However, the sourness has somewhat disappeared on account of the heat and it will take some time to redevelop the flavor. With the additional yeast, my starter has been doing really well, rising and falling throughout the day very easily.

I've been playing around with the dough and even with the same recipe, the bread never comes out exactly the same. Depending on the pan or stone I bake the bread on/in, the temperature during the day, or how I treat the dough, the bread comes out differently each time. I think it's good to be adventurous in bread making as with anything else in life. Figure out what you like best and play around until you have something you like.

Raspberry Cream Cake

Since I have become much more comfortable with chiffon cake in the last year and have been disappointed with the bakeries in my area lately, I decided to make my own birthday cake this year. I've also bean meaning to get more mileage out of my newly acquired cake pans which have thus far only been used to make the relatively tall chocolate cake, not to mention it's also fun to make your own cake. I still have not gotten to Christina Tosi's banana cake yet but I do hope to when I feel up to making another cake soon.

Back to my birthday cake, I love fresh fruit cakes with whipped cream and princess cake, so I decided to come up with a cake that combines elements of both. Typically, princess cake is composed of layers of genoise with raspberry jam, kirsch custard, whipped cream, and a layer of marzipan covering the entire thing. Since I'm not a fan of kirsch or marzipan, I decided to make a cake consisting of genoise, raspberry jam, vanilla pastry cream, raspberries, and whipped cream.


Overall, the cake turned out much better than expected, but I could have taken out even more sugar in each of the components and reduced the amount of vanilla slightly. The recipe below reflects these adjustments. I will probably try a white cake next time and add more jam so the flavor comes through more. I decorated the cake the same way I decorated the chocolate cake last time simply because I wasn't really sure what I could do otherwise and was too lazy to do much to it.

Raspberry Cream Cake with Pastry Cream and Jam
Adapted from Martha Stewart

Genoise
3 tablespoons unsalted butter, melted, plus more, softened, for pans
6 extra large eggs, room temp, separated
1 cup sugar
3/4 teaspoon pure vanilla extract
1 1/8 cups cake flour, sifted
Pinch of salt

Preheat oven to 350 degrees Fahrenheit, butter the bottoms of two 8 in cake pans, line with parchment paper, set aside

Whisk egg yolks in a heatproof bowl over a pot of simmering water with 3/4 cup sugar until sugar is melted and eggs are warm, remove from heat. Add vanilla and salt, then beat 3-4 minutes until pale and thick ribbons fall from the whisk.

In another clean bowl or in your stand mixer, whip egg whites at high speed until soft peaks, then gradually add remaining 1/4 cup sugar while beating until it reaches stiff, glossy peaks. Fold 1/3 of the egg whites into the yolk mixture to lighten. Then fold the remaining whites into the mixture being careful not to deflate them. Fold in cake flour, then butter carefully.

Divide the batter among the pans, bake until a toothpick comes out clean, about 25 minutes. If not using  nonstick pans and cake is securely attached to the pan, invert onto a cooling rack and let cool this way so the cake doesn't deflate. Otherwise, simply let cool until ready to assemble.

Pastry Cream
1 cup whole milk
1/4 of a vanilla bean, scraped
1/8 cup plus 1 tbsp sugar
2 egg yolks
2 tbsp cornstarch
1 tbsp unsalted butter
Pinch of salt

Whisk together egg yolks, cornstarch, and sugar in a bowl. Meanwhile, heat milk and vanilla bean with the scraped seeds and salt in a pot until simmering. Mix half a cup of milk into yolks while whisking. Pour egg yolk mixture back into pot and heat while whisking until it thickens. Pour the pastry cream over a strainer into a bowl, mix in tablespoon of butter. Cover with plastic wrap with plastic wrap on the surface of the pastry cream so a skin doesn't form. Let cool for about 2 hours.

Stabilized Whipped Cream
2 1/4 cups heavy cream
1 tsp of unflavored gelatin
2 tbsp water/pomegranate or cranberry juice
1/2 cup sugar
A drop of red food coloring(optional)
Pour water/juice into a small pot, sprinkle gelatin over. Let sit for 5 minutes to soften. Meanwhile, beat cream and sugar until very soft peaks. Heat gelatin until it dissolves. Pour gelatin mixture into the softly whipped cream and continue to beat until soft peaks.Mix in food coloring if desired.
 
 
To assemble:
Raspberry Jam, seedless
Pastry Cream, cooled and mixed to loosen
Whipped Cream
Raspberries
Cakes, cooled and sliced into layers
 
 
Level cakes if necessary and cut each cake into two layers. Lay bottom layer of one cake down onto cake pedestal or plate. Spread a layer of raspberry jam onto the cake, top with half the pastry cream. Lay top layer of the cake on top.
 
 
Spread with another layer of jam, then a layer of whipped cream. Cover in berries, top with another thin layer of whipped cream, and the top layer of the other cake flipped over. Spread another layer of jam, the remaining pastry cream, and top with final layer of cake. Frost the entire cake with the remaining whipped cream. Decorate with raspberries. Refrigerate to set up for 1-4 hours before serving.

Friday, June 10, 2011

Zero Waste Living

A few months ago, I heard about the blog The Zero Waste Home. The author, Bea, discusses how she and her family live a waste free lifestyle. Though their life is simplified, it is no less fulfilling. They place value in experiences and memories as opposed to material objects. Compared to simply aiming to lead an ecofriendly lifestyle, many might say that they've taken it to the extreme, but isn't this how we all used to live for many years before the arrival of manufacturing and modern conveniences?

While this type of lifestyle may not work for everyone, i do think we can all stand to minimize clutter in our lives and reevaluate the choices we make as consumers. There are many benefits that go along with a simpler lifestyle such as healthier homecooked food, less exposure to toxins commonly found in household products, and reduced living costs.

I'm still a long way from reaching where i want to be in terms of decluttering my life, but Bea's blog has certainly inspired me and made me think. Even if you don't agree with everything on the blog, check it out and decide for yourself.

Wednesday, June 1, 2011

Easy Tapioca Pudding and Chiffon Cake

Ever since i discovered this recipe for a quick and easy tapioca pudding, it has become my favorite simple dessert. It's amazingly comforting and the same blog also has a great recipe for chiffon cake. Never mind that this is the only tapioca pudding recipe i've ever tried. Compared to other recipes i've seen which require soaking the tapioca beforehand, this really is a no-brainer.

The recipe can easily be scaled up or down although it will take a bit longer to cook. I just use whatever kind of milk i have around although whole milk does produce a richer end product. I've found that about a third a cup of sugar is plenty for my palate, especially since my family tends to like things less sweet.

I've also made a green tea version of this pudding by simply adding a few teaspoons of matcha green tea powder(enough to produce a nice green color)and steeping a few green tea bags in the milk as it's heating up. I adjusted according to taste until I thought the flavor was strong enough.
Note: add the matcha powder towards the end to avoid discoloration as it cooks

This will definitely be a favorite in my repertoire for many years to come and i'm thinking about trying a coffee version next. I also recently made a strawberry crisp with a honey mascarpone cream adapted from this recipe and it has become my favorite crisp recipe, slightly nudging ahead of Ina Garten's apple and pear crisp.

Tapioca Pudding
Adapted from Chocolate and Zucchini

4 cups milk (I prefer whole milk, but whatever you have)
1/2 a large vanilla bean
1/2 cup + 1 tablespoon small pearl tapioca
1/3 cup granulated sugar
1/4 teaspoon salt

Pour the milk into a heavy bottomed medium saucepan. Split the vanilla bean and scrape the seeds, add the bean and seeds to the milk.

Bring milk to a simmer over medium heat. Sprinkle the tapioca into the milk and stir with a heatproof spatula or wooden spoon.

Cook, at a simmer for 15 minutes stirring occasionally. Taste for doneness, should be tender and translucent, but still have some resistance.

Remove from the heat, add the sugar and salt, and stir to dissolve. The mixture will still be quite thin, but will firm up nicely after cooling. You can add more or less tapioca based on your preferences. Transfer to a serving bowl or container and let cool completely.

Tapioca can be made a day ahead, and keeps for a few days in an airtight container in the fridge.

For the green tea version: Steep several green tea bags in the simmering milk, towards the end, add several teaspoons of matcha powder. Skip the vanilla bean, you may add half a teaspoon of vanilla extract if you like.

For a coconut version: use 2 1/4 cups of milk and one can of coconut milk.

For a coffee version: stir in 1-2 tsp of instant coffee granules at the end, depending on your taste. Add more sugar if necessary.
coffee tapioca
This chiffon cake is based off of a Chinese chiffon cake and makes for the perfect light dessert. I've made it countless times and I'm excited to see what other flavors I can make. I'm already thinking about coffee and green tea versions by simply adding some instant coffee granules and matcha green tea powder. This recipe is pretty much foolproof as long as you whip your egg whites enough and use a not nonstick tube pan. (Update: I've added some variations on this chiffon cake that I've tried below.)

Chinese Style Chiffon Cake (鸡蛋糕)
Adapted from Chocolate and Zucchini
Recipe is for one large cake

195 grams cake flour
1/2 tsp baking powder
9 medium egg yolks (8 large or 7 extra large)
Large pinch of salt
1.5 teaspoons pure vanilla extract
165 grams granulated sugar
150ml (3/4 cup) water/juice/milk
120ml (1/2 cup) vegetable oil (any light flavored oil will work)
9 medium egg whites (8 large or 7 extra large)

Preheat the oven to 340°F and have a 10 inch not nonstick tube pan(angel food cake pan) ready, ungreased.

Sift the flour and baking powder together 3 times, set aside.

In a large bowl, combine the egg yolks, salt, vanilla extract, and about 50g of the sugar (reserve the rest for later). Whisk for several minutes, until it turns pale yellow and thick ribbons fall from the whisk. Mix in the oil and the water, and whisk well between each. Add in the flour mixture and whisk until well blended, but don't overmix.

In another large bowl with a clean whisk or in a stand mixer with a whisk attachment, beat the egg whites on medium speed until they start to foam. Add the remaining sugar and beat until stiff.

Whisk a third of the beaten egg whites into the batter and mix until blended. Fold in the rest of the egg whites gently but not timidly with a spatula until just blended. Be sure there are no large clumps of egg whites left as this will leave wet spots in the finished cake.

Pour the batter into the pan. Bake until set and golden brown, about 45-50 minutes or until a skewer comes out clean. As soon as it comes out of the oven, invert the pan onto a cooling rack so the cake won't collapse, let cool completely. To unmold, run a knife around the edge and remove the cake, run knife under the cake to remove the bottom. It's easier to remove if you slice through the cake but you can also just slip the center out or serve it on the pan.
Inverting the cake when I first started, I've since found a bottle that fits the center hole well so I've been using that.
For a Lemon Chiffon Cake:
Rub 2 tsp grated lemon zest into the sugar with your fingers. Then use as directed. Add 1 tbsp lemon juice when beating the egg whites. Add 1 tsp of lemon extract to the egg yolks and reduce vanilla extract to 1 tsp.

For an Orange Chiffon Cake:
Use orange juice. Rub 2 tsp grated orange zest into the sugar with your fingers. Then use as directed.  Add 1 tsp orange extract if you'd like. Reduce vanilla extract to 1 tsp.

For a Coconut Chiffon Cake:
Use coconut milk. Sift one 2 oz package of coconut milk powder with the dry ingredients. Add 1 tsp of coconut extract if desired. Reduce vanilla extract to 1 tsp.
coconut chiffon


Friday, April 1, 2011

A Relatively Tall Cake

So, last week, i decided to bake this cake. I had been eyeing it for a while after seeing it here and bought myself a set of nice cake pans in order to make this cake. I have a set of inexpensive ones, but really wanted some better quality ones that would measure up to how delicious this cake looked.


However, seeing as how tall it was and knowing that my family would never be able to finish it, i reduced the recipe to a two layer 8" cake. (2/3 the recipe)Unfortunately, i forgot to take into account that less baking time would be needed, so this cake did not end up as moist as it could've been. It was still good nonetheless, with a very rich chocolatey flavor that wasn't overly sweet. I didn't make the raspberry filling, but decided to top it with raspberries for some color. It would also be good with just some raspberry jam spread between each layer.

Double Chocolate Layer Cake
Adapted from Epicurious via Love and Olive Oil

2 ounces good quality semisweet chocolate
1 cup hot brewed coffee
2 cups sugar
1 2/3 cups all purpose flour
1 cup unsweetened cocoa powder(not Dutch process)
1 1/3 tsp baking soda
1/2 tsp baking powder
5/6 tsp salt
2 eggs
1/2 cup vegetable oil
1 cup buttermilk
1 tsp vanilla extract
Unsalted butter, for greasing pans

Ganache Frosting: (halve this if layering with another filling)
3/4 pound good quality semisweet chocolate
3/4 cup heavy cream
1 1/2 tbsp sugar
1 1/2 tbsp light corn syrup
3 tbsp unsalted butter

Preheat oven to 300°F and grease two 8" cake pans. Line the bottoms with rounds of parchment paper and grease with butter.

Finely chop the chocolate and combine in a bowl with the coffee. Let mixture stand, stirring occasionally, until chocolate is melted and mixture is smooth.

Into a large bowl sift together the sugar, flour, cocoa powder, baking soda, baking powder, and salt. In another large bowl with an electric mixer beat eggs until thickened slightly and pale yellow, about 5 minutes. Slowly add oil, buttermilk, vanilla, and melted chocolate mixture to eggs, beating thoroughly after each addition. Add flour mixture and beat on medium speed until just combined.

Divide batter between pans and bake on the middle rack until a cake tester comes out clean, 45 minutes to an hour. Cool layers completely in pans on racks. Run a thin knife around edges of pans and invert onto the racks. Remove parchment paper and slice each cake into two layers. Cake layers may be made 1 day ahead and kept, wrapped well in plastic wrap, at room temperature.

To make frosting:
Finely chop the chocolate. In a saucepan bring cream, sugar, and corn syrup to a boil over moderately low heat, whisking until the sugar is dissolved. Remove pan from the heat and add chocolate, whisking until the chocolate is melted. Cut butter into pieces and add to frosting, whisking until smooth.

Transfer frosting to a bowl and cool, stirring occasionally, until spreadable. It's easiest to spread the frosting when it's warm as opposed to letting it cool too much.

Spread the frosting or another filling between the cake layers, assemble, and spread ganache over the top and sides. Cake keeps, covered and chilled, 3 days. Bring cake to room temperature before serving.

This is the second real cake i've ever made(out of the ones that i'm counting anyway) not including things like bundt cake, angel food cake, or pound cake. When i think of cake, it has to be something suitable for a birthday with layers and some type of frosting. The last real cake I made was this strawberry cake with a simple chiffon cake, strawberries, and whipped cream. Planning on making Christina Tosi's banana hazelnut cake when i have some more free time. You can find the recipe by searching online.

Friday, March 18, 2011

Follow my blog with Bloglovin

Hey there,

Follow this blog and other blogs over at bloglovin, really easy to keep track of your blogroll.

-Mel