Showing posts with label Chiffon Cake. Show all posts

Saturday, July 5, 2014

An Eggy Chiffon Cake


Ever since I started making Chinese Chiffon Cake several years ago, my dad has been reminiscing about the chiffon cakes he used to have that had an even stronger fragrance of fresh eggs. There are many things that just don't taste the same as they used to according to my dad. I think this could be due to the fact that our food system and our food resources aren't the same as they used to be, at least where we live. Despite that, I've made many attempts to come as close as I can to that flavor by changing up my original Chinese Style Chiffon Cake recipe. Unlike the process in which I come up with new variations and flavors by adding things, I eliminate any flavors that might compete with the eggs' natural fragrance and try to use the best eggs that I can get. I came the closest to that elusive memorable flavor by taking out the vanilla, using water, and using eggs that I found at my local farmers' market. However, it still wasn't quite good enough.

About a month ago, I decided to try my luck again. This time, I thought I would just forget trying to go any further with my other recipe and instead look for a super basic traditional recipe without any additional liquid or leavening agent to maximize the egg flavor. I couldn't find one I liked, so I improvised from a few different recipes. I'm happy to say that I think this is the very best I've done and will be able to do since there is basically nothing but eggs, sugar, a bit of flour, and oil in this cake. The cake is super fragrant, leavening agent free, yet still perfectly fluffy.

Since there is no leavening agent in this cake, it could be a bit more temperamental. In order to whip egg whites best, you want them at room temp rather than straight from the fridge. Eggs however, separate best when they're cold. So, I separate the eggs first, let them sit for 15 minutes if I can, and then whip them. The recipe here uses almost the same amount of sugar as my other recipe, but there is less than half the amount of cake flour and no additional liquid. On paper, it seems like it wouldn't work, but it does.

Traditional Chinese Chiffon Cake
Makes One 10-inch cake

8 large egg yolks
8 large egg whites
145 g granulated sugar
90 g cake flour
100 g(a bit less than 1/2 cup) vegetable oil
large pinch of salt

Preheat the oven to 350°F and have a 10 inch not nonstick tube pan(angel food cake pan) ready, ungreased.

Sift the flour 3 times, set aside.

In a large bowl, combine the egg yolks, salt, and 50g of the sugar (reserve the rest for later). Whisk for several minutes, until it turns pale yellow and thick ribbons fall from the whisk. Mix in the oil and whisk well.

In another large bowl with a clean whisk or in a stand mixer with a whisk attachment, beat the egg whites on medium speed until they start to foam. Add the remaining sugar and beat until stiff.

Whisk a third of the beaten egg whites into the egg yolks and mix until blended. Fold in the rest of the egg whites gently but not timidly with a spatula until just blended. Be sure there are no large clumps of egg whites left as this will leave wet spots in the finished cake.

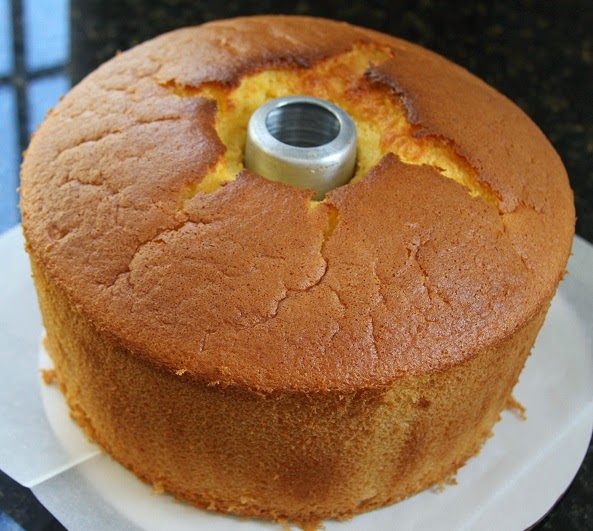
Fold in the sifted flour a bit at a time trying not to lose any volume until well incorporated. Pour the batter into the pan. Pour the batter slowly along the edge of the mixing bowl to break up any large air bubbles if you'd like. Tap the pan to pop any remaining bubbles. Bake until set and golden brown, about 30-35 minutes or until a skewer comes out clean.

As soon as it comes out of the oven, invert the pan onto a cooling rack so the cake won't collapse, let cool completely. To unmold, run a knife around the edge and remove the cake, run knife under the cake to remove the bottom. It's easier to remove if you slice through the cake but you can also just slip the center out or serve it on the pan. Cake will last several days covered at room temp.


Saturday, March 1, 2014

Matcha Green Tea Chiffon Cake

Continuing on the chiffon cake train, here's a variation of chiffon cake I've been wanting to try for ages. Looking at the recipes for matcha chiffon cake available online, I decided to just add some matcha powder to my go-to chiffon cake, up the sugar a bit to balance out the bitterness of the tea, and it worked wonderfully.

Most recipes for matcha chiffon cake advise sifting the matcha powder with the dry ingredients and I have to agree this is the way to go. It's easier since you don't have to bother dissolving the matcha powder and on my first attempt at this cake, I found that dissolving the matcha powder in hot water actually resulted in quite a strong bitter aftertaste in the cake resembling that of overbrewed tea.

Depending on the brand of green tea powder you use, you may want to add more or less and adjust to your taste. I used Maeda-en matcha powder and found 12 g provided a strong green tea flavor while not going over the top.


Matcha Chiffon Cake
Makes One large 10 inch cake

195 grams cake flour
1/2 tsp baking powder
12 g (2 1/2 tbsp) matcha/green tea powder
9 medium egg yolks (8 large or 7 extra large)
Large pinch of salt
205 grams granulated sugar
150 ml (3/4 cup) milk
120 ml (1/2 cup) vegetable oil (any light flavored oil will work)
9 medium egg whites (8 large or 7 extra large)

Preheat the oven to 340°F and have a 10 inch not nonstick tube pan(angel food cake pan) ready, ungreased.

Sift the flour, matcha powder, and baking powder together 3 times, set aside.

In a large bowl, combine the egg yolks, salt, and about 60 g of the sugar (reserve the rest for later). Whisk for several minutes, until it turns pale yellow and thick ribbons fall from the whisk. Mix in the oil and the milk, and whisk well between each. Add in the flour mixture and whisk until well blended, but don't overmix.

In another large bowl with a clean whisk, handheld mixer, or in a stand mixer with a whisk attachment, beat the egg whites on medium until they start to get foamy. Then, stream in the remaining sugar and beat until stiff peaks.

Add a third of the beaten egg whites into the egg yolk mixture and mix with the whisk until blended. Fold in the rest of the egg whites gently with a spatula until just blended. Be sure there are no large clumps of egg whites left as this will leave wet spots in the finished cake.

Pour the batter into the pan. Bake until set and golden brown, about 45-50 minutes or until a skewer comes out clean. As soon as it comes out of the oven, invert the pan onto a cooling rack so the cake won't collapse, let cool completely. If your tube pan doesn't have feet for inverting or the cake is higher than the pan, invert the pan onto a funnel or a thin neck bottle.

To unmold, run a knife around the edge and remove the cake, run the knife under the cake to remove the bottom. It's easier to remove if you slice through the cake but you can also just slip the center out or serve it on the pan.

Cake will last several days at room temp in an airtight container or wrapped well in plastic wrap.

Saturday, February 22, 2014

Banana Chiffon Cake

Trying out different flavors of chiffon cake has been on my mind for several years. I've posted a berry chiffon cake here on the blog before, but I've been looking for chiffon cakes that are more similar to the Chinese style chiffon cake, also posted here, in texture. I like making chiffon cakes for everyday snacking and the texture of the berry one I felt was not quite suited for eating out of hand. The first flavor variation I attempted several years ago was actually banana, but I never found a recipe that I really liked until I tried this one recently.
I've adapted it to my liking and the process is basically the same as my Chinese style chiffon cake. The texture is light and airy without being mushy and it has the perfect amount of sweetness and banana flavor. Best of all, there are no extra egg whites or yolks to bother with.
 
Like most banana recipes, you'll want to use very ripe bananas for the best flavor. I'm excited to substitute other fruit purees to see how they work, so look out for that in the future. However, knowing me, that would probably be the far-off future.
 
Banana Chiffon Cake
Adapted from Wen's Delight
Makes One Large 10 inch chiffon cake
 
140 g cake flour
1/2 tsp baking soda
1/4 tsp baking powder
220 g bananas, about 3 bananas
8 large egg yolks (9 medium or 7 extra large)
Large pinch of salt
80 ml vegetable oil (1/3 cup)
160 g granulated sugar
1 tsp pure vanilla extract
8 large egg whites (9 medium or 7 extra large)
1/2 tsp cream of tartar
 
Preheat oven to 350 deg F. Sift the cake flour, baking soda, and baking powder together 3 times. Set aside.
 
In a large bowl, combine the egg yolks, salt, vanilla extract, and a bit more than half the sugar (reserve the rest for later). Whisk for several minutes, until it turns pale yellow and thick ribbons fall from the whisk. 
 
Puree the bananas in a food processor. Mix the oil into the egg yolk mixture, then the pureed bananas, whisking well between each. Fold in the flour mixture and whisk until well blended, but don't overmix.

In another large bowl with a clean whisk or in a stand mixer with a whisk attachment, combine the egg whites, cream of tartar, and the remaining sugar and beat on medium speed until stiff.

Fold a third of the beaten egg whites into the batter with a spatula and mix until blended. Add in the rest of the egg whites and fold gently until just blended. Be sure there are no large clumps of egg whites left as this will leave wet spots in the finished cake.
 
Pour the batter into the pan. Bake until set and golden brown, about 45-50 minutes or until a skewer comes out clean. As soon as it comes out of the oven, invert the pan onto a cooling rack so the cake won't collapse, let cool completely. To unmold, run a knife around the edge and remove the cake, run knife under the cake to remove the bottom. It's easier to remove if you slice through the cake but you can also just slip the center out or serve it on the pan.
 
Cake will last several days at room temperature well wrapped.

Sunday, January 29, 2012

Chiffon Cake II


I don't really know how to start other than ...

Here's another chiffon cake you should add to your repertoire. Like the other basic chiffon cake(Chinese Style Chiffon Cake)  posted on this blog, this recipe can be adapted to make many different variations by simply adding different extracts and juices/liquids. Although the taste of the basic recipe is essentially the same, the addition of cream of tartar as opposed to all baking powder gives the cake a moister, spongier texture. Try it and you'll know what I mean. There is also a higher proportion of eggs to flour and water. I don't think one is better than the other, it's just a matter of preference.

This cake is a bit more complicated than the other one if you want to follow the specific ratio of eggs to flour, but not much more. My aunt weighs her eggs with the shell, then using a ratio of 18 oz eggs to 5.4 oz flour, she determines how much flour to use. It's not much more work to do this, especially since you'll be weighing other ingredients as well. However, if you don't want to go to the trouble of doing this extra step, the cake should still turn out fine using a specific number of eggs and a given amount of flour. Based on the couple of times I've made this, the average weight of 8 large eggs is about 17 oz, so that means on average, you should use 5.1 oz cake flour.

I will continue to make both this as well as my other chiffon cake depending on my mood and what I have in the pantry. I really like that both of these recipes have specific weight measurements because I do find that it ensures more consistent results. The recipe below is a version with lemon extract and orange juice, but you can easily switch these out for something else.

Chiffon Cake II
Recipe Adapted from my Auntie Thelma

8 large eggs, separated(9 medium or 7 extra large eggs)
5.1 oz(145 grams) of cake flour(or determined based on 18 oz eggs/5.4 oz flour ratio)
160 grams granulated sugar(5.6 ounces)
1 tsp pure vanilla extract
1/2 tsp pure lemon extract
1/4 tsp baking powder
1/2 tsp cream of tartar
large pinch of salt
3/8 cup vegetable oil
1/2 cup orange juice

Preheat oven to 340 degrees Fahrenheit. Weigh out your ingredients. Sift the flour and baking powder three times.

To the egg yolks, add more than half of the sugar and whisk for 1-2 minutes with a large whisk until it is pale and ribbons fall from the whisk. Add in the extracts and salt. Add the oil, then the juice, whisking thoroughly after each addition. Mix in the sifted flour and baking powder until just combined.

Add the cream of tartar to the egg whites and mix in a stand mixer with the whisk attachment on high speed until frothy. Then slowly add in the remaining sugar and whip until stiff, but not dry peaks.

To the egg yolk mixture, mix in a third of the egg whites to lighten the mixture. Then, fold in the remaining egg whites, being careful not to deflate the egg whites.

Pour into a 10 inch tube pan and bake for 45 mins or until a skewer inserted comes out clean. Invert and let cool completely before removing from pan.

Sunday, January 1, 2012

Berry Chiffon Cake

I set out to make a pink cake and this is what happened. My little cousin's favorite color is pink, so I thought it only appropriate to make her a cake that matched her love of the color. She's six, so there aren't very many things she's passionate about yet, though the color pink is one of them. Unfortunately, it's not so easy to make a pink cake without the use of food coloring, especially with the addition of raspberry puree, so what resulted was a greyish pink cake. It was intended to be a strawberry cake, but I just couldn't find good strawberries at this time of year. So, I made it into a raspberry cake with a strawberry raspberry chiffon cake as the base. I filled the cake with a raspberry mascarpone cream filling and frosted it with whipped cream.
The cake overall tasted pretty good, but with fresh puree, the cake would have been much better in flavor and texture. I pureed frozen berries, so the resulting cake was not as moist as it could have been. However, in late fall, it's good to know that you can still make a nice berry flavored cake with frozen berries.

I'm still on the hunt for simple not-nonstick aluminium baking pans that are good quality but at a reasonable price so that I can start baking chiffon layer cakes without using a tube pan. They are actually surprisingly hard to find since nonstick has become the norm in bakeware. I think the cakes baked in such pans might not be as light as cakes baked in a tube pan, but a cake with a hole in the middle doesn't look all that great and is harder to decorate. A cake the size of a 10 inch tube pan is also too big for my family, so another alternative might be to get a smaller tube pan.

I'll just share the berry chiffon cake recipe here because the whipped cream frosting is already on this blog and the filling is just something I mixed up to my taste. I combined raspberry puree with powdered sugar and mascarpone cheese lightened with whipped cream.

Berry Chiffon Cake
Adapted from BakingBites.com

2 1/4 cups sifted cake flour
1 1/2 cups sugar
1 tbsp baking powder
large pinch of salt
3/4 cup fresh berry puree(I used frozen strawberries and raspberries)
1/4 cup + 3 tbsp vegetable oil
1 1/2 tsp vanilla extract
7 large eggs, separated, room temp
food coloring(optional)

Preheat the oven to 325 degrees F. Add 8-10 drops of red food coloring to the berry puree or a small amount of gel food coloring if using.

In a bowl, sift together the flour, 1 1/4 cups sugar, salt, and baking powder. In another bowl, whisk together the berry puree, vegetable oil, vanilla, and egg yolks. Mix the berry mixture into the dry ingredients and whisk until well combined.

In a stand mixer, whisk the egg whites on medium high speed until foamy, then gradually add in the remaining 1/4 cup sugar. Continue whisking until stiff peaks. Take a third of the whipped egg whites and whisk vigorously into the berry-egg yolk base to lighten. Gently fold in the remaining egg whites with a spatula until fully incorporated.

Pour the batter into a 10 inch tube pan and bake for 50-60 minutes until an inserted toothpick comes out clean. Invert and let cool completely before unmolding.

Wednesday, November 9, 2011

Blum's Coffee Crunch Cake


This is another one of those recipes that I've long wanted to try making myself and my dad's birthday was the perfect time to do so. I was surprised at how simple this cake was to make. Although there are a few components to get together, the process is fairly simple. The addition of lemon juice and zest brings some dimension to the cake, but it is unexpected, so if you would rather keep it simple, just substitute with coffee. I thought the combination worked, but some members of my family thought it was a bit strange. Overall though, everyone enjoyed it and compared to coffee crunch cakes I've had, this one is definitely the best. The chiffon cake itself would be great in other layer cakes as well.

Blum's Coffee Crunch Cake
Recipe from Flo Braker via fancyfoodfancy
Makes One 10 inch cake

Cake Layers
1 1/4 cups cake flour, sifted
1 1/2 cups sugar
1/2 tsp salt(halve if using fine salt)
1/4 cup water
6 large egg yolks
1 cup egg whites(about 6-8 large eggs)
1 tsp cream of tartar
1 tsp vanilla extract
1 tbsp lemon juice/coffee
1 tsp grated lemon zest(optional)

Preheat the oven to 350 degrees F. Sift the cake flour with the salt and 3/4 cup of sugar, set aside. Whisk the egg yolks in a bowl with 1/4 cup sugar until pale and thick. Whisk in the water and beat until thickened.

Whip the egg whites in a stand mixer with a whisk attachment on high speed until frothy, add the cream of tartar and whip until soft peaks. Slowly add the remaining 1/2 cup sugar while whisking until it reaches stiff, glossy peaks. Whisk in vanilla, lemon juice/coffee, and lemon zest if using.

Fold the egg whites and flour mixture into the egg yolks starting with a third of the whites followed by a third of the flour mixture alternating until everything is incorporated. Pour batter into an ungreased noncoated 10 inch tube pan with a removable bottom.

Level top and bake for 50-55 minutes until a cake tester comes out clean and it springs back when lightly touched. Invert onto a cooling rack and let cool completely. Cut around the sides and bottom to remove cake from pan, cut into 2 layers.

Coffee Crunch
1 tbsp baking soda, sifted
1/4 cup strong brewed coffee
1 1/2 cups sugar
1/4 cup light corn syrup

In a heavy-bottom medium saucepan, mix the coffee, sugar, and corn syrup. Stirring occasionally, heat over medium low heat until sugar dissolves, then increase to medium-high heat and let boil until it reaches 290 degrees F on a candy thermometer. Remove from heat and stir in the baking soda. Pour onto a parchment lined or oiled baking sheet, do not spread. Let cool for at least 1 hour. Break into small pieces in a ziploc bag using a rolling pin. Store in an airtight container for assembly later.

Whipped Cream Frosting
2 cups heavy cream
2 tbsp sugar
2 tsp vanilla extract

Whip the cream, sugar, and vanilla in a stand mixer with the whisk attachment until soft peaks. Frost cake with whipped cream, then refrigerate cake. Top cake with coffee crunch when ready to serve.


I made this cake for my mom's birthday per her request. It's made up of genoise from the raspberry cream cake, vanilla custard from the banana cream pie recipe, strawberries, and bananas topped with a whipped cream frosting. While my cake baking skills are improving, my decorating skills still need some work. This was a nice combination, but I put a bit too much fruit in it. Next time, I might try adding some baking powder or cream of tartar to this genoise for an airier cake. It's not traditional and might no longer be considered a true genoise, but to each their own. 

Wednesday, June 1, 2011

Easy Tapioca Pudding and Chiffon Cake

Ever since i discovered this recipe for a quick and easy tapioca pudding, it has become my favorite simple dessert. It's amazingly comforting and the same blog also has a great recipe for chiffon cake. Never mind that this is the only tapioca pudding recipe i've ever tried. Compared to other recipes i've seen which require soaking the tapioca beforehand, this really is a no-brainer.

The recipe can easily be scaled up or down although it will take a bit longer to cook. I just use whatever kind of milk i have around although whole milk does produce a richer end product. I've found that about a third a cup of sugar is plenty for my palate, especially since my family tends to like things less sweet.

I've also made a green tea version of this pudding by simply adding a few teaspoons of matcha green tea powder(enough to produce a nice green color)and steeping a few green tea bags in the milk as it's heating up. I adjusted according to taste until I thought the flavor was strong enough.
Note: add the matcha powder towards the end to avoid discoloration as it cooks

This will definitely be a favorite in my repertoire for many years to come and i'm thinking about trying a coffee version next. I also recently made a strawberry crisp with a honey mascarpone cream adapted from this recipe and it has become my favorite crisp recipe, slightly nudging ahead of Ina Garten's apple and pear crisp.

Tapioca Pudding
Adapted from Chocolate and Zucchini

4 cups milk (I prefer whole milk, but whatever you have)
1/2 a large vanilla bean
1/2 cup + 1 tablespoon small pearl tapioca
1/3 cup granulated sugar
1/4 teaspoon salt

Pour the milk into a heavy bottomed medium saucepan. Split the vanilla bean and scrape the seeds, add the bean and seeds to the milk.

Bring milk to a simmer over medium heat. Sprinkle the tapioca into the milk and stir with a heatproof spatula or wooden spoon.

Cook, at a simmer for 15 minutes stirring occasionally. Taste for doneness, should be tender and translucent, but still have some resistance.

Remove from the heat, add the sugar and salt, and stir to dissolve. The mixture will still be quite thin, but will firm up nicely after cooling. You can add more or less tapioca based on your preferences. Transfer to a serving bowl or container and let cool completely.

Tapioca can be made a day ahead, and keeps for a few days in an airtight container in the fridge.

For the green tea version: Steep several green tea bags in the simmering milk, towards the end, add several teaspoons of matcha powder. Skip the vanilla bean, you may add half a teaspoon of vanilla extract if you like.

For a coconut version: use 2 1/4 cups of milk and one can of coconut milk.

For a coffee version: stir in 1-2 tsp of instant coffee granules at the end, depending on your taste. Add more sugar if necessary.
coffee tapioca
This chiffon cake is based off of a Chinese chiffon cake and makes for the perfect light dessert. I've made it countless times and I'm excited to see what other flavors I can make. I'm already thinking about coffee and green tea versions by simply adding some instant coffee granules and matcha green tea powder. This recipe is pretty much foolproof as long as you whip your egg whites enough and use a not nonstick tube pan. (Update: I've added some variations on this chiffon cake that I've tried below.)

Chinese Style Chiffon Cake (鸡蛋糕)
Adapted from Chocolate and Zucchini
Recipe is for one large cake

195 grams cake flour
1/2 tsp baking powder
9 medium egg yolks (8 large or 7 extra large)
Large pinch of salt
1.5 teaspoons pure vanilla extract
165 grams granulated sugar
150ml (3/4 cup) water/juice/milk
120ml (1/2 cup) vegetable oil (any light flavored oil will work)
9 medium egg whites (8 large or 7 extra large)

Preheat the oven to 340°F and have a 10 inch not nonstick tube pan(angel food cake pan) ready, ungreased.

Sift the flour and baking powder together 3 times, set aside.

In a large bowl, combine the egg yolks, salt, vanilla extract, and about 50g of the sugar (reserve the rest for later). Whisk for several minutes, until it turns pale yellow and thick ribbons fall from the whisk. Mix in the oil and the water, and whisk well between each. Add in the flour mixture and whisk until well blended, but don't overmix.

In another large bowl with a clean whisk or in a stand mixer with a whisk attachment, beat the egg whites on medium speed until they start to foam. Add the remaining sugar and beat until stiff.

Whisk a third of the beaten egg whites into the batter and mix until blended. Fold in the rest of the egg whites gently but not timidly with a spatula until just blended. Be sure there are no large clumps of egg whites left as this will leave wet spots in the finished cake.

Pour the batter into the pan. Bake until set and golden brown, about 45-50 minutes or until a skewer comes out clean. As soon as it comes out of the oven, invert the pan onto a cooling rack so the cake won't collapse, let cool completely. To unmold, run a knife around the edge and remove the cake, run knife under the cake to remove the bottom. It's easier to remove if you slice through the cake but you can also just slip the center out or serve it on the pan.
Inverting the cake when I first started, I've since found a bottle that fits the center hole well so I've been using that.
For a Lemon Chiffon Cake:
Rub 2 tsp grated lemon zest into the sugar with your fingers. Then use as directed. Add 1 tbsp lemon juice when beating the egg whites. Add 1 tsp of lemon extract to the egg yolks and reduce vanilla extract to 1 tsp.

For an Orange Chiffon Cake:
Use orange juice. Rub 2 tsp grated orange zest into the sugar with your fingers. Then use as directed.  Add 1 tsp orange extract if you'd like. Reduce vanilla extract to 1 tsp.

For a Coconut Chiffon Cake:
Use coconut milk. Sift one 2 oz package of coconut milk powder with the dry ingredients. Add 1 tsp of coconut extract if desired. Reduce vanilla extract to 1 tsp.
coconut chiffon